Patch Feature Tutorial
The patch feature in WL4Editor is an advanced feature that allows you to apply hex edits or custom C code to your ROM.
Why?
The patch feature is helpful for several reasons:
- Add or remove patches through UI. Removing a patch will restore the original data at the hook location in the ROM.
- Makes use of WL4Editor’s save data structure (RATS) to automatically manage the location of the custom code in the patch.
- Failsafe checks to ensure that your patches do not overlap with one another.
- Easy and quick to recompile + inject your patch code while developing the patch itself.
Using Patches
If you only plan to use patches that other people have made, then it is a straightforward process that doesn’t require any knowledge of ASM or low level reverse engineering.
Terminology
- ARM EABI: The ARM Embedded Application Binary Interface. This is a collection of programs used in various stages of compiling code into binary.
- gcc: The GNU compiler collection. This is the compiler bundled with the ARM EABI for compilation of C into ASM.
- Hook: A string of bytes that will overwrite some code or data in the main area of the ROM, so that it can be hijacked to use your patch code.
- Debugger: A program that allows you analyze the runtime details of a binary. In the case of WL4, some examples of useful GBA debuggers are Bizhawk or no$gba.
- Static analysis tool: A program that allows you to decompile and analyze the structure of a binary. In the case of WL4, some useful examples of static analysis tools capable of analyzing ARM7TDMI are IDA Pro or Ghidra.
- RATS: ROM Allocation Tag System. WL4Editor uses a modified version of conventional RATS (which is popular in other ROM hacking programs) for dynamically managing the save data after the main ROM in WL4.
- short: 2 bytes which are interpreted as a single, 16-bit value.
- 03000000: RAM address mapping. All work RAM (WRAM) is of the form 03xxxxxx.
- 08000000: ROM address mapping. All ROM locations, when referred to by the game’s own code, look as if they are of the form 08xxxxxx. The location 0x1BBFC in the actual ROM file is referred to in the game’s code by the pointer 0801BBFC.
- Little-endian: All multi-byte values are stored in reverse from what is considered human-readable; this is called “little-endian”. So, if Wario’s Y velocity is a short with value 0x1234 at 030018B0, then 030018B0 will contain 0x34, and 030018B1 will contain 0x12. Additionally, the pointer 0801BBFC would be ordered as bytes in the ROM as FC BB 01 08.
- ARM7TDMI: The CPU architecture of the GBA. It is notable for having 2 execution modes: ARM (32-bit instructions) and the reduced instruction set Thumb (16-bit instructions). Most of the ROM’s code is Thumb code.
How does it work?
WL4Editor will use gcc from the ARM EABI to compile your C patch into ASM, then assemble that ASM file into an object file, then extract the binary from the object file for use in your patch. Then, WL4Editor uses the same method it typically uses for any other saving feature to find a place for your compiled patch code. Finally, it applies hooks to the ROM, and makes a master record of all patches in a RATS chunk so that patch entries can be read from your ROM or removed.
The hook string may contain a pointer to your patch code, denoted by the identifier “P”. WL4Editor first determines the location of the patch code in RATS, and then uses those save chunk addresses to replace P with the address in RATS space. The code is compiled in Thumb mode, and these address are incremented by 1 so that execution of the patch will be initiated in Thumb mode.
Removal of a patch will take the original bytes which were overwritten by your hook string (stored in the patch master record chunk) and reapply them to the ROM, then reclaim the RATS space used by your patch code and update the patch master record accordingly.
Getting Started
To use the patch feature, you must first install the ARM EABI.
For all systems (Windows, Mac, Linux), download the ARM EABI here and select the appropriate download for your system. Either the EXE installer or binary ZIP is fine.
The first time you attempt to save patch changes in the Patch Manager Dialog, you will be prompted to select the folder in your system containing the ARM EABI binaries; this is going to be a folder in your ARM EABI installation called “bin”. After selecting the bin folder, you should be able to use WL4Editor’s patch feature.
To change the EABI binary folder in the future, edit the path in WL4Editor’s INI file.
Patch Manager Dialog
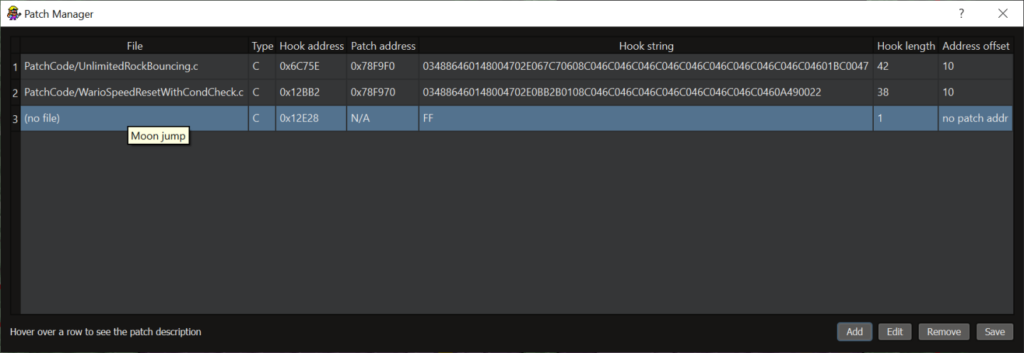
The Patch Manager Dialog allows you to add, remove, modify or re-compile patches in your ROM file. The buttons are as follows:
- Add: Open the Patch Edit Dialog to create a patch for the ROM.
- Edit: Select a patch in the Patch Manager, then press this button to modify the attributes of the patch.
- Remove: Select a patch in the Patch Manager, then press this button to remove it.
- Save: Save all the patches to the ROM. None of the changes from the other buttons will apply until you press Save. Pressing Save will also re-compile any C or assembly patches.
After adding a patch to the ROM, the Patch Manager will have a row for the patch. The row contains several columns with information about the patch:
- File: The patch file which is relative to the ROM’s location.
- Type: The type of patch (binary, ASM, C)
- Hook address: The hexadecimal address in the ROM file where the hook will be placed.
- Hook string: The string for the hook. This string shown in the UI does not display the patch address identifier.
- Hook length: The length of the hook string in bytes, including the patch address.
- Address offset: The offset in the hook string to place the address of the patch.
You can also hover over the patch entry row to see its description.
Patch Edit Dialog
The Patch Edit Dialog allows you to configure an individual patch for your ROM.
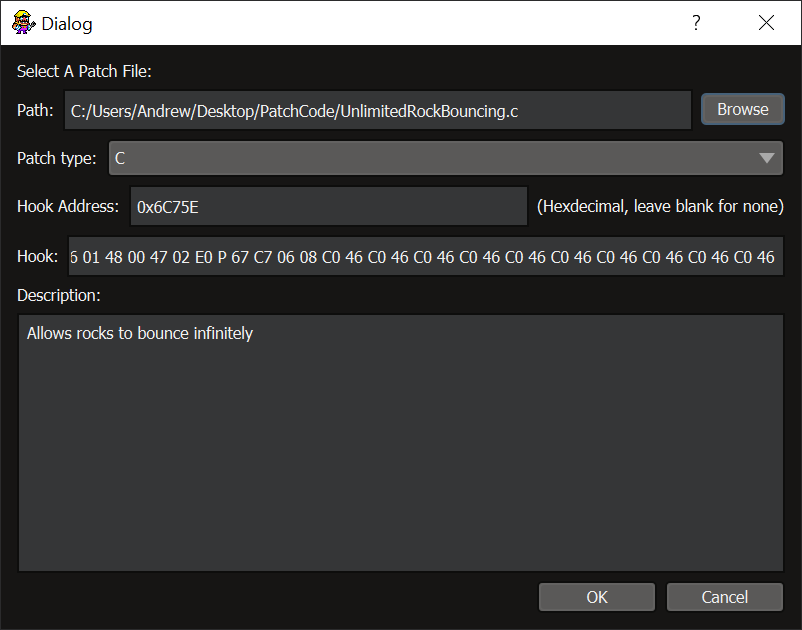
The Patch Edit Dialog has several fields for configuring your patch:
- Path: The path for the file used in the patch. Leave this blank to create a hex edit patch.
- Patch type: The type of the patch file (binary, ASM, C)
- Hook Address: The address to place the hook in the main ROM. Accepts hexadecimal integers less than 0x78F970. (the 0x prefix is optional)
- Hook: This is the string which will be placed at the hook address. Must be an even number of hexadecimal digits, and may optionally include the patch address identifier “P”. After WL4Editor has determined where it will place the patch content in the save data structure, the P will be replaced with the address of the beginning of the save data content.
- Description: A description of what the patch does.
In the case of ASM or C patches, you may also include the following identifiers anywhere in the file inside a comment to auto-populate the fields of the Patch Edit Dialog: @HookAddress, @HookString, @Descriptionm
Writing Patches
Writing patches for WL4 does not require deep knowledge of any of the following concepts, but it will be easier with examples to look at, and familiarity with the basic ideas of:
- Assembly
- C programming
- GBA debugging
- Static analysis
Read the following patch examples in order; the various details surrounding how a patch is created will be covered at various points.
Example 1: Hex Edit (easy)
For this one, we’re going to find and make a hex edit that increases Wario’s jump height.
A good starting point to find the value used for Wario’s jump height is to find the point at which this value is used. Since Wario’s initial jump velocity would be set from this value, we should first find the location in RAM that holds this value.
The first step in this practice should always be to consult a knowledge base about known information in the ROM: https://docs.google.com/document/d/1W0MZblzPF1X1_oA2ThzZh99fctgbbBM-jctCjNu5gIk/edit
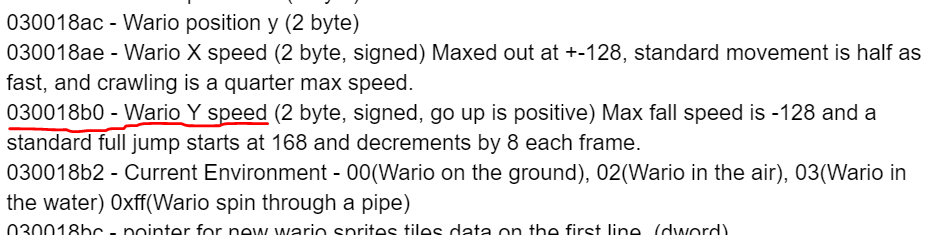
The above document shows that the Y velocity is a 16-bit value at 0x30018B0. But what if it wasn’t a known RAM location? We’ll go through the process to find this RAM location.
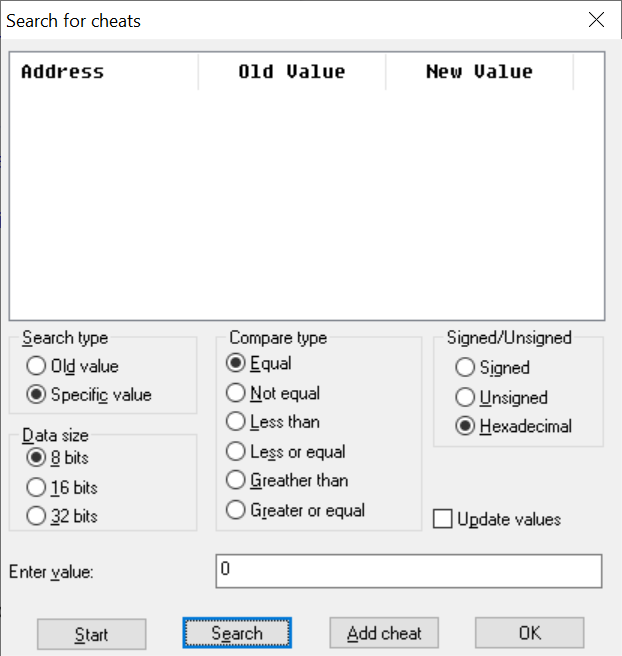
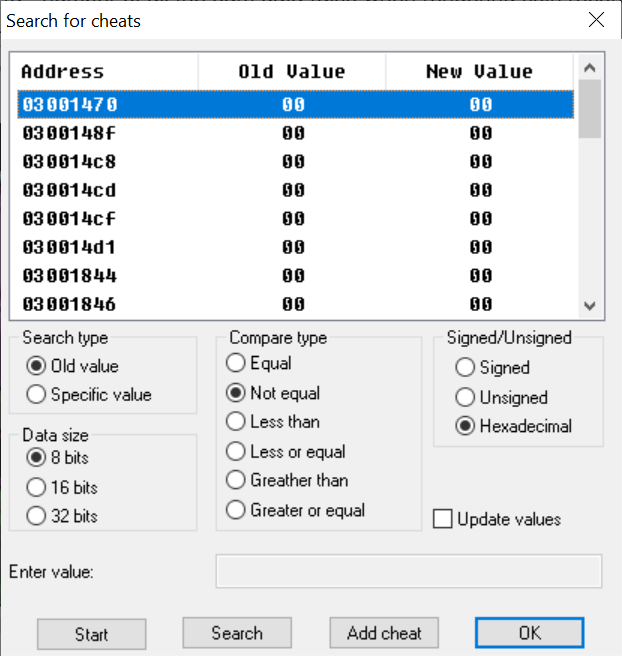
We’re going to find Wario’s Y velocity using VisualBoyAdvance. First, let’s put Wario in a state where the Y velocity is known; it should be 0 if he is standing (in theory). Then let’s use the “search for cheats” dialog:
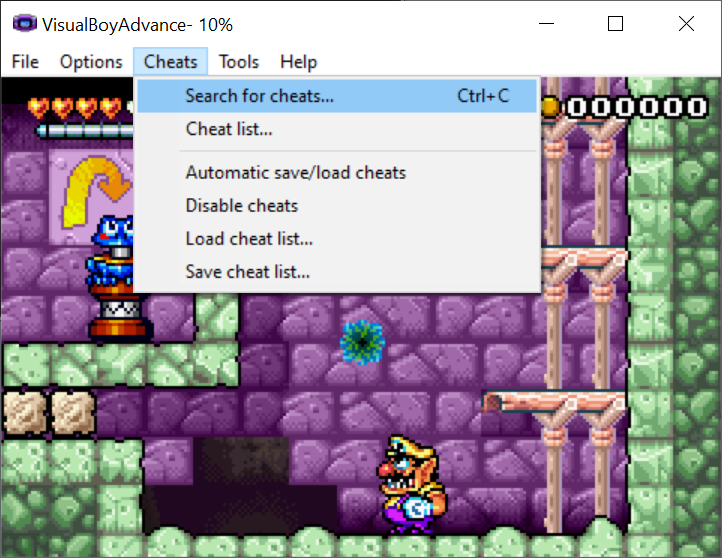
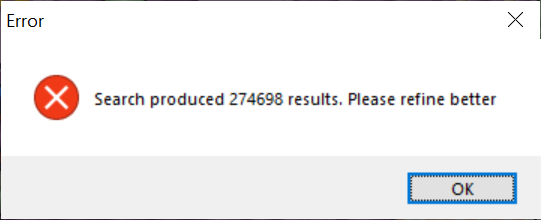
We will click “start”, then select “specific value” and “equal”, then enter the value “0” and click search. This will search for all RAM values which are equal to the specific value “0”.
The results have been narrowed down a little, but not enough to start considering any RAM locations:
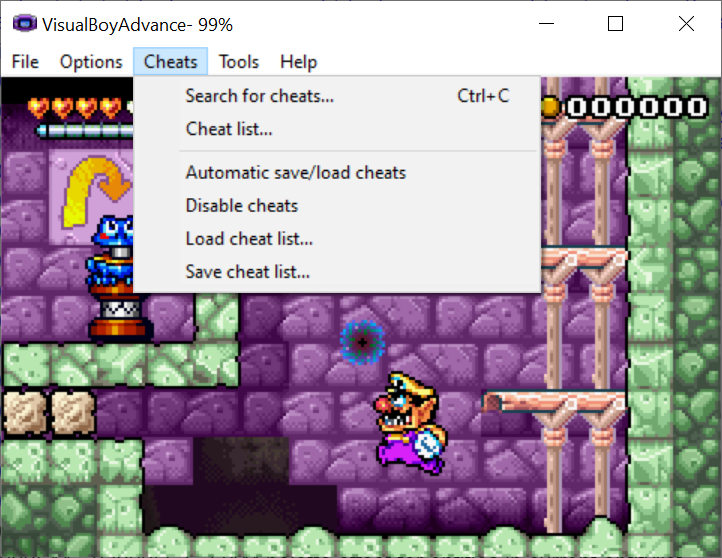
You may close the dialog with OK. The state of the search we’re conducting will persist when we re-open the dialog. Now, let’s jump, and while holding the jump button, select the menu to pause emulation:
This time, we will select “old value” and “not equal”, then click search. This will further narrow down our selection to RAM values which have changed. Since Wario is in the middle of a jump, the Y velocity should be something other than 0:
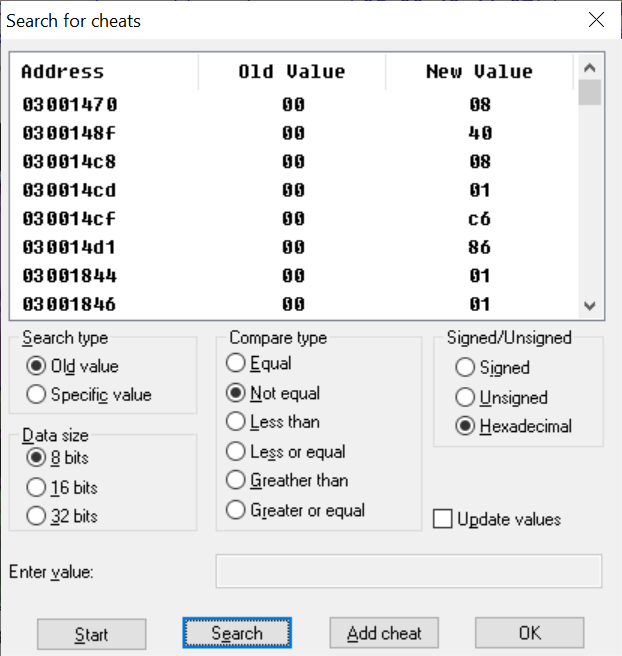
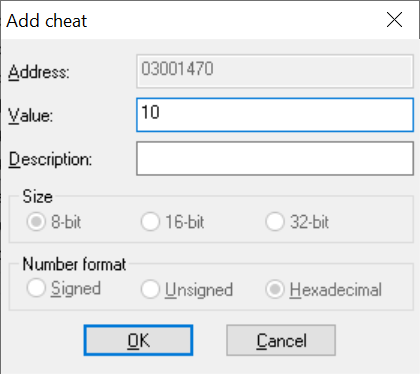
Now we’re getting somewhere. Continue stopping the game at different jump heights or searching for the specific value “0” while standing until the list is narrowed down a bit more. Once you’re tired of it, we’re going to try tweaking RAM until we find the Y velocity. Select one of the RAM values, then “add cheat”.
Set it to some number like 10.
Now, try jumping in the game and see if the behavior has changed. If not, remove the cheat and try changing a different value. Once you get to changing 030018B0, you should see a behavioral change when Wario jumps:
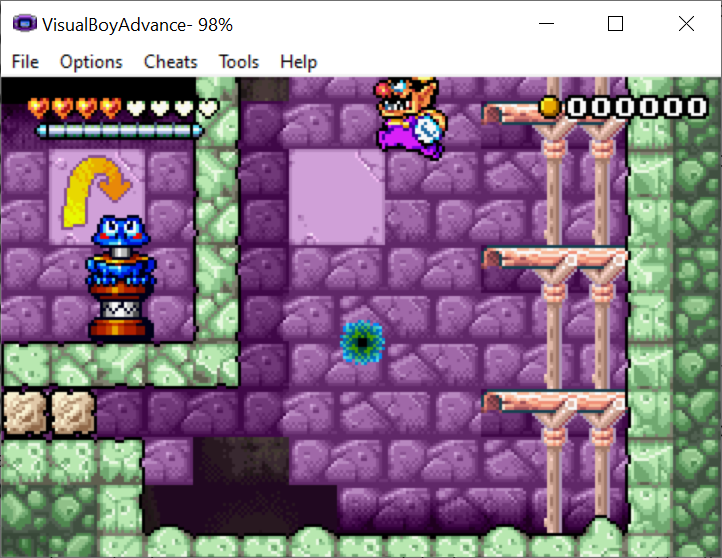
We’ve found our candidate RAM location. We only searched for a single changing byte, but we don’t know the size of the value yet; it could be a short. We’ll find out soon enough. We will show what to do next, using no$gba.
Go to the same location with Wario, then from the menu do Debug > Define Break/Condition. Using no$gba’s breakpoint syntax, we use [030018b0]! to tell the game to pause execution when 030018B0 changes.
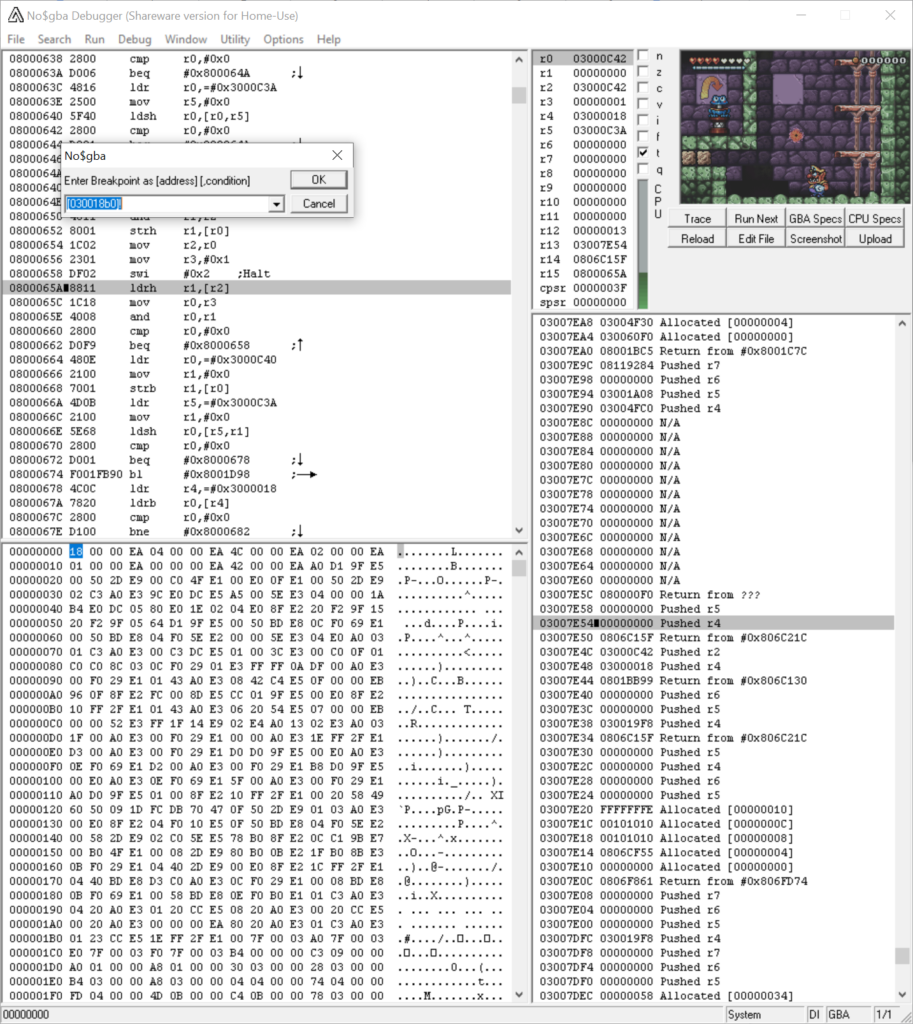
Now, resume execution and jump. The debugger should pause:
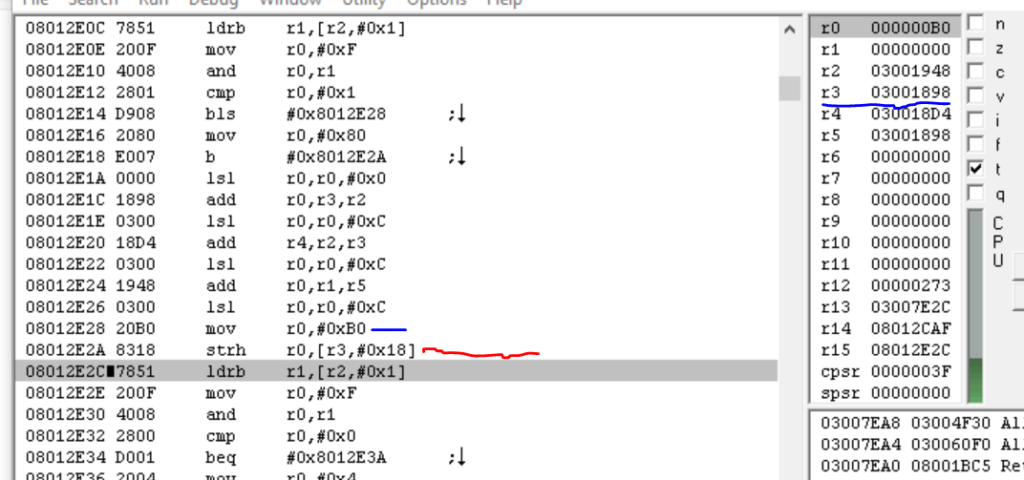
All the info we need is right here. The line marked in red is the one whose execution modified the memory address 030018B0. It is storing a 16-bit value (“strh” stores 16 bits, as opposed to “strb” for 8 bits or “str” for 32 bits) which is contained in r0 (which we can see the lower 16 bits are 00B0) into the address pointed to by r3 (03001898), indexed by 0x18 (03001898 + 0x18 = 030018B0).
The source of this 00B0 value is from the instruction above, “mov r0, #0xB0”. This instruction places (or “moves”, hence “mov”) the 8-bit value 0xB0 into r0 for the strh which comes next. So, if we modify the 0xB0 to instead be 0xFF, then Wario’s initial jump velocity should be greater.
The instruction’s encoding shown on the left is 20B0; since the representation in the ROM is little-endian, the B0 will be the first of those 2 bytes. So, we wish to change 0x12E28: B0 -> FF with a patch.
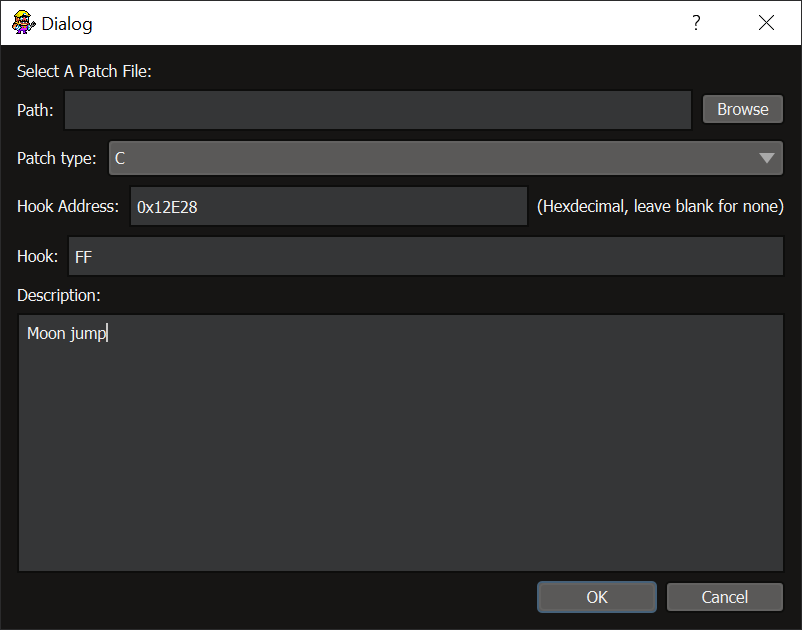
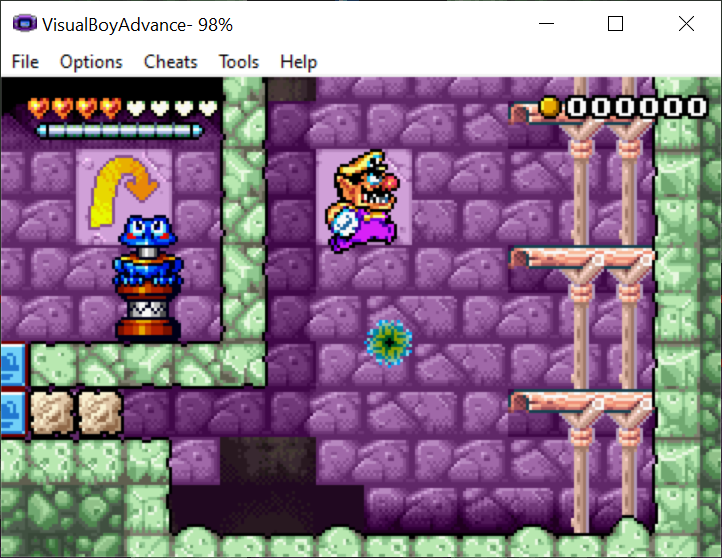
Now we can see that Wario jumps higher:
Example 2: Pointer Replacement (medium)
For this one, we’re going to make a troll patch that kills Wario when he grabs a diamond.
The basic premise behind this patching method is that if the game at some point uses a vector table to jump to a subroutine, then it’s very easy to hijack because you only need to point the address in the vector table to a new location: your patch code. Coincidentally, the game uses a vector table to jump to the function which sets up entity graphics. So, that’s a pretty convenient place to hijack things on a per-entity basis.
It’s a good idea to start off with knowledge that’s already been built up. The wario-land group has an IDA Pro idb file with many useful annotations for static analysis of the WL4 ROM. After digging through things in IDA Pro a bit, we can find this function:
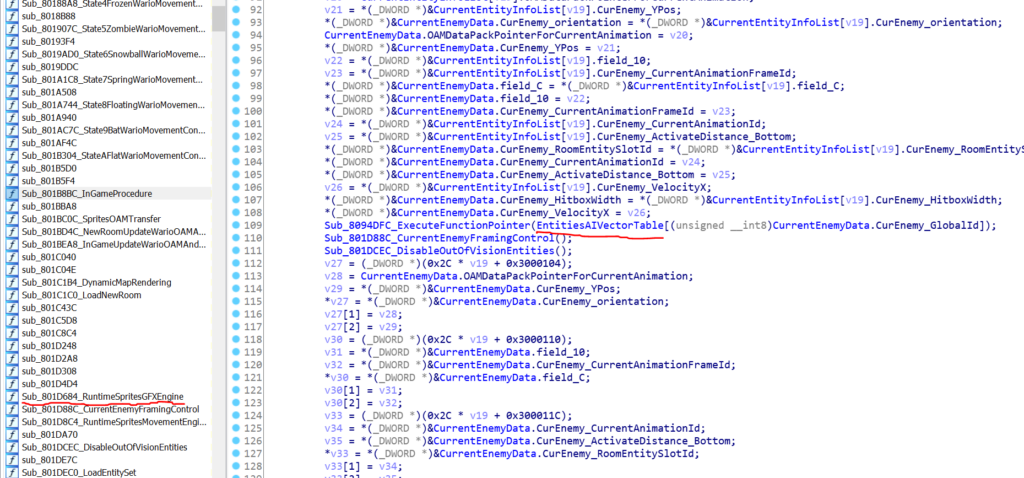
If we follow the EntitiesAIVectorTable symbol, we can find the pointers for the entity graphics and behavior functions:

Since the entity ID for the diamond is 6, the pointer to the diamond behavior is located at 0878E818 (0878E800 + 6 * 4), and it points to the location 0802C848. Why isn’t the function at 0802C849? That’s because the lowest bit in a branch address in ARM7TDMI denotes whether execution should resume in ARM or Thumb mode. 0 = ARM and 1 = Thumb, so this is a pointer to 0802C848, and the game executes the code there in Thumb mode. (you can’t have an odd-numbered address anyway, because instructions are always 2 or 4 bytes in length)
So we already know our hook address (0x78E818) and our hook string (“P”); this will replace the 4 bytes at address 0x78E818 with the address of our patch after WL4Editor compiles our patch code and determines its location within the RATS structure.
Let’s write some simple wrapper code that simply calls the original diamond behavior. There should be no change in behavior so far with this:
// @Description Diamonds instantly kill you
// @HookAddress 0x78E818
// @HookString P

#define sub_802C848 ((void (*)()) 0x802C849)

__attribute__((no_caller_saved_registers))
void LethalDiamonds()
{
    // Vanilla code for diamond GFX
    sub_802C848();

    // Custom code
    // TODO
}
Here is a breakdown of the above lines:
#define sub_802C848 ((void (*)()) 0x802C849): Defines a function pointer to the parameterless void function located at 0802C848, called “sub_802C848” which is callable just like any other function. Note that the value is set as 0x802C849, since it’s pointing to a Thumb function.
__attribute__((no_caller_saved_registers)): This tells gcc to save and restore any registers clobbered by the assembly which is compiled from your code, so that register contents are only affected minimally by your patch code.
void LethalDiamonds(): Your patch file should contain exactly one function, and it should match the signature of the function you’re hijacking. Since sub_802C848 is a parameterless void function, so is LethalDiamonds().
sub_802C848();: The only thing we’re doing so far in our patch is calling the diamond’s original behavior so that it functions properly.
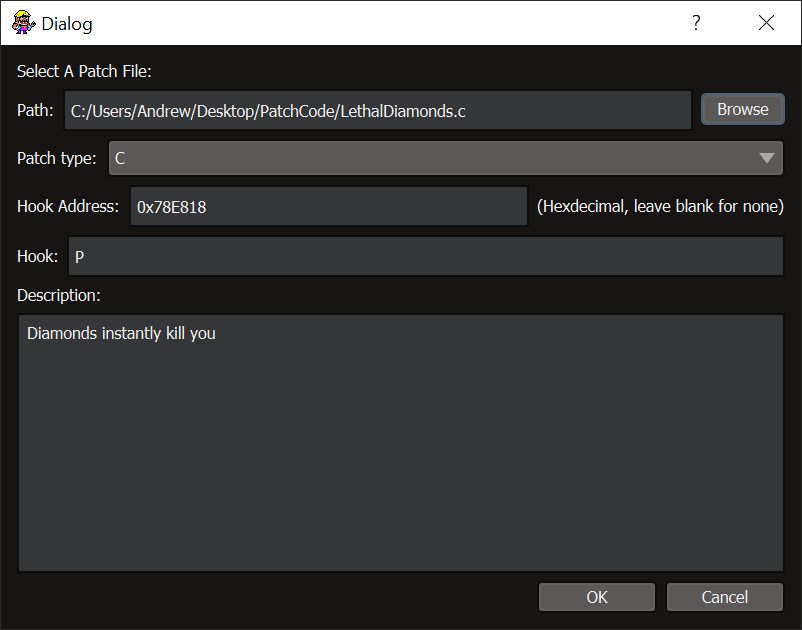
Because of the annotations at the top of the file, the Patch Edit Dialog should automatically be populated:
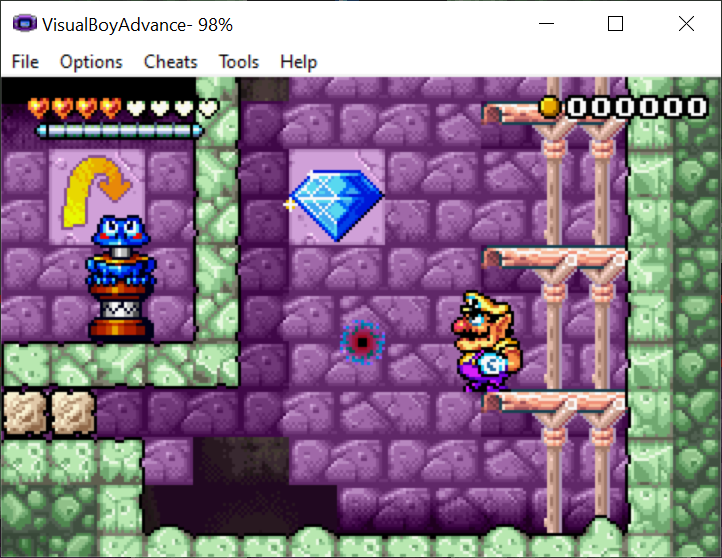
Observe that diamonds are still functioning normally:
Now, we would like to add some code that kills Wario if he touches the diamond. For this, we will need 2 things: a way to determine if Wario has touched the object, and a way to kill Wario.
Searching through things a bit with IDA Pro, we come across this function:
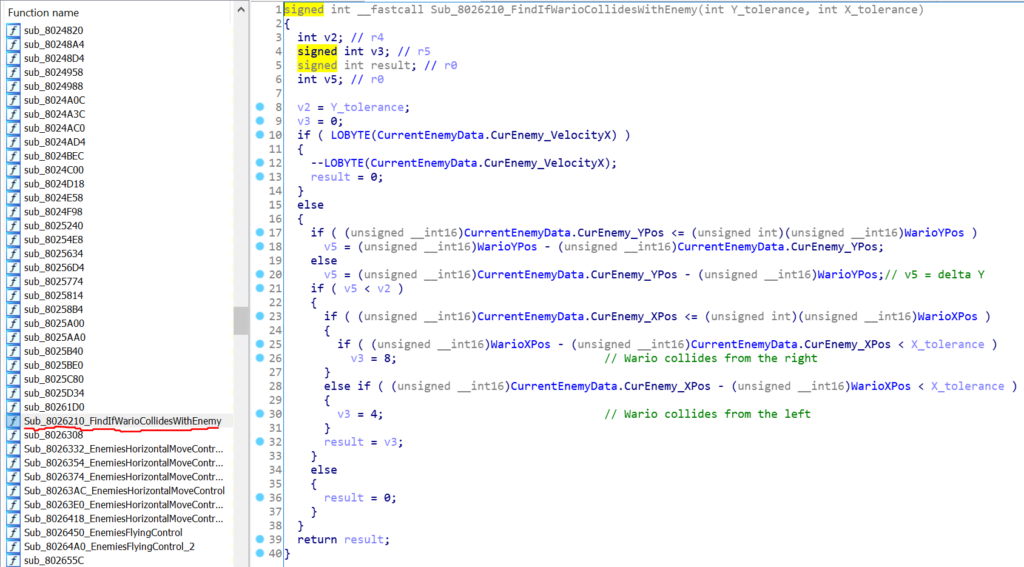
It’s an int function which takes in 2 parameters; Y_tolerance is how close Wario must be to the entity vertically, and X_tolerance is how close Wario must be to the entity horizontally. If Wario does not collide, 0 is returned. If he collides from the left, 4 is returned. If he collides from the right, 8 is returned.
We can also find this function:
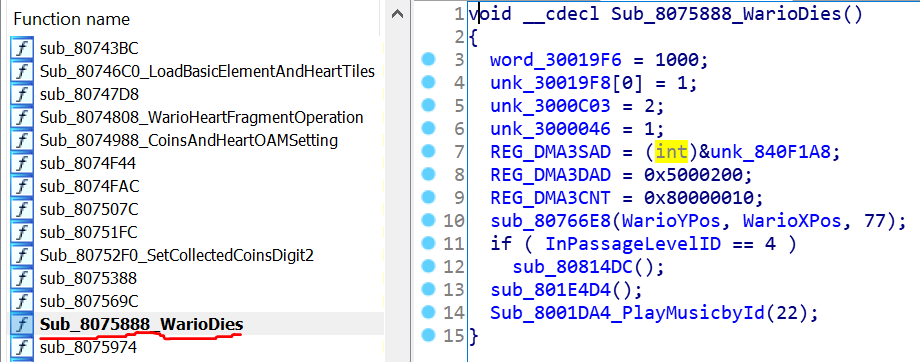
This function unconditionally kills Wario. It is a parameterless void function.
Now that we’ve found the functions we’re looking for, we’re going to add the missing logic to our patch funtion:
// @Description Diamonds instantly kill you
// @HookAddress 0x78E818
// @HookString P

#define sub_802C848 ((void (*)()) 0x802C849)

#define EntityCollision ((int (*)(int, int)) 0x8026211)
#define KillWario ((void (*)()) 0x8075889)

__attribute__((no_caller_saved_registers))
void LethalDiamonds()
{
    // Vanilla code for diamond GFX
    sub_802C848();

    // Custom code
    int collision = EntityCollision(80, 80);
    if(collision)
    {
        KillWario();
    }
}
#define EntityCollision ((int (*)(int, int)) 0x8026211): Function pointer for the entity collision function. It is an int function with 2 int parameters. As usual, it is incremented by 1 since it is a Thumb function.
#define KillWario ((void (*)()) 0x8075889): Function for killing Wario. It is a parameterless void function much like the diamond behavior function. Thumb function.
int collision = EntityCollision(80, 80);: Obtain the result of the EntityCollision function and store it in a variable. 80 and 80 were the most appropriate tolerance values I came up with through my own trial and error to make this work smoothly.
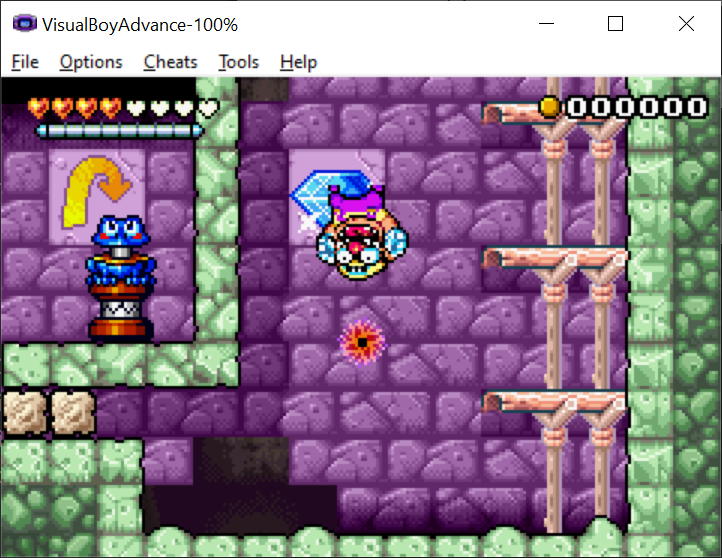
We can see that the diamond now kills Wario:
Example 3: Thumb Hook (hard)
For this one, we’re going to make it so that rocks and Shitain-Hakase are always considered to be in the “thrown” state. This will allow for some neat physics tricks like bouncing off the rock multiple times.
The difference with this type of hook is that the code we are hijacking is not called by a vector table, so we need to be really careful how we write and place our hook to ensure that the execution of the original code is unaffected.
There are many places we could try to modify the behavior of all entities meeting some criteria; any place in the code which runs each frame during the main game loop while rooms are loaded will suffice. Here is one such location:
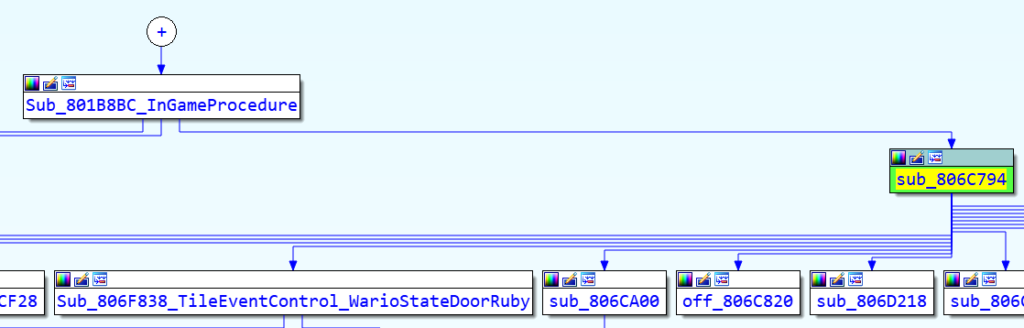
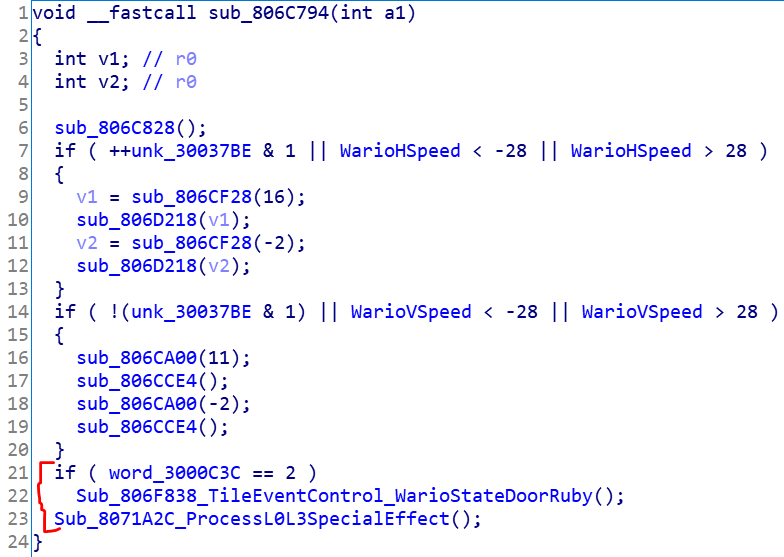
This function should meet our needs. We will need to select some complete high-level structure in the pseudocode to replace with our hook, and replicate that structure in our code. In most cases, we will need at least 18 bytes for the hook, so some structure like an if statement usually provides enough room to work with. The section we will replace has been marked above.
The marked code corresponds to this ASM:
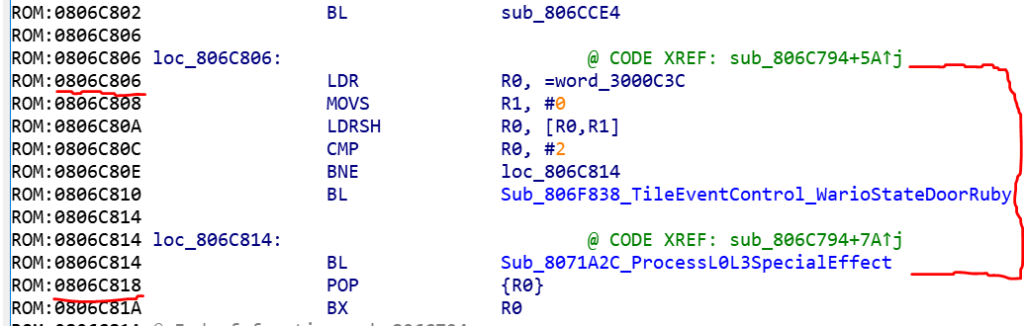
So our hook location will be 0x6C806, and we wish to use 0x6C818 – 0x6C806 = 18 bytes. A hook for our purposes can be assembled from this source code:
.thumb
	.dcb 1
	ldr r0, .DATA
	mov lr, r0
	ldr r0, .DATA + 4
	bx r0
	.dcb 1
.DATA:
	.word 0x0806C819
	.word 0xAAAAAAAA
Here is an explanation of what this code does:
.thumb: Specify that the assembler should interpret these instructions in Thumb mode.
.dcb 1 (1): This adds 1 halfword filler here. The destination of the LDR instructions coming up must be word-aligned, meaning that the addresses in the ROM of what they are loading must be divisible by 4. Since the DATA section would otherwise be preceded by 5 instructions without this filler (instructions are 2 bytes each), the DATA section would be offset by 10 bytes in this file and thus not word-aligned. This is actually not an issue for us, because our hook address (0x6C806) modulo 4 is 2, so with 10 bytes the data would actually end up being aligned without this filler once the hook is placed in the ROM. But, the assembler doesn’t know that, so we add this filler to simulate the initial word-misalignment we have in our hook’s case. We will take care to disregard this filler in the assembled binary.
ldr r0, .DATA; mov lr, r0: Load the return address (0806C818) into LR so that our patch code knows where to return to. The lowest bit specifies if it should resume execution in ARM or Thumb mode (1 = Thumb) so we write this value as 0x0806C819.
ldr r0, .DATA + 4; bx, r0: Load the address of our patch and branch to it.
.dcb 1 (2): This filler is here because without it, the DATA section would actually be misaligned. 0x6C806 + 8 = 0x6C80E, which is not divisible by 4. So, we need the section before DATA to take up 10 bytes.
.word 0x0806C819: This is the hardcoded address we load into LR so that the patch code knows where to return when it’s done executing. It is incremented by 1 to denote that execution should resume in Thumb mode (at address 0806C818).
.word 0xAAAAAAAA: This is just a noticeable identifier we will use to replace with our patch address identifier “P” in the hook string.
Let’s assemble and analyze the binary from this hook:
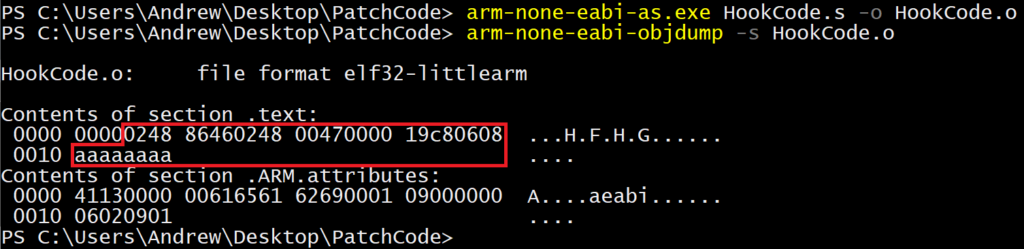
We will ignore the initial “0000” as that is our filler we just used for padding so the assembler would like our ASM file. The hook string is:
0248 86460248 00470000 19c80608 P
Now, we will write our C code:
// @Description Rocks are always in the "thrown" state
// @HookAddress 0x6C806
// @HookString 0248 86460248 0047c046 19c80608 P
// @EntryFunctionSymbol UnlimitedRockBouncing2

struct OAM_REC {
    char PAD[2];
    unsigned char EntityID;
};

#define OAM ((volatile struct OAM_REC*) 0x3000964)

struct ENTITY_REC {
    char PAD1;
    unsigned char ThrownFlag;
    char PAD2[0x15];
    unsigned char EntityID;
    char PAD3[0x14];
};

#define ENTITIES ((volatile struct ENTITY_REC*) 0x03000104)

#define word_3000C3C (*(volatile short*) 0x3000C3C)
#define sub_806F838 ((void (*)()) 0x806F839)
#define sub_8071A2C ((void (*)()) 0x8071A2D)

__attribute__((no_caller_saved_registers))
void UnlimitedRockBouncing2()
{
    // Substituted code
    if (word_3000C3C == 2)
    {
        sub_806F838();
    }
    sub_8071A2C();

    // Process all active entities
    for(int i = 0; i < 24; ++i)
    {
        // End when the last active entity has passed
        if (OAM[i].EntityID == 0xFF)
        {
            break;
        }

        // If it is a rock, set its bounce state
        switch(ENTITIES[i].EntityID)
        {
            case 0x15: // Rock
            case 0x80: // Arewo Shitain-Hakase
            ENTITIES[i].ThrownFlag = 1;
        }
    }
}
Here is an explanation of elements not already covered by example 2:
@EntryFunctionSymbol: an optional identifier to tell the WL4Editor the entry point of the whole patch. sometimes, you may want to put multiple functions in one patch file, using sub-routine methods to make the code more read-able. you can just put the function name there without the braces after the identifier to make it works. since C programming language standard does not allowed function overwrite, so the same function name can only appear once in the same file.
struct OAM_REC {…} / struct ENTITY_REC {…}: We define structs for interfacing with structure arrays in RAM. These 2 structure formats are mostly known, and we only need to give names to fields which are used in our code. The rest can be padded with byte arrays.
#define OAM ((volatile struct OAM_REC*) 0x3000964) / #define ENTITIES (…): These preprocessor symbols allow us to access the OAM and Entity arrays at their location in RAM. They are marked “volatile” to ensure that the compiler does not attempt to remove any code that uses these symbols. The optimizer might try to remove that code if it cannot detect that it is being used for IO.
#define word_3000C3C / sub_806F838 / sub_8071A2C: Definitions for the parts of code in the ROM which were replaced by our hook.
The rest should be self-explanatory. Our patch code starts with the code which was replaced by our hook (see the marked section). Then, we loop through all the OAM entries to find either a rock (ID = 0x15) or Shitain-Hakase (ID = 0x80), and set its ThrownFlag property to 1. We have reached the end of the OAM entries once we get an ID of 0xFF or have looked at 24 entries, whichever comes first.
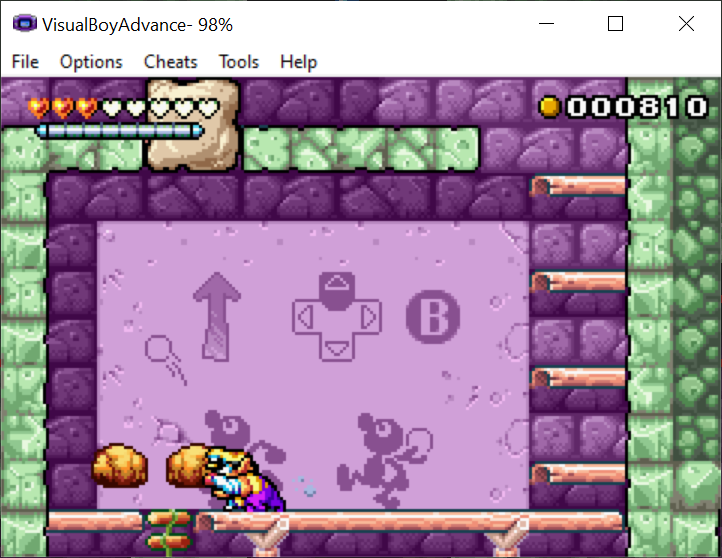
After doing all this and applying our patch, the rocks should now bounce off each other:
Additional Info
Why does the hook code use this roundabout way (loading the return address manually into LR)? Wouldn’t using BL/BLX be much cleaner? We cannot use BL because with the BL instruction, the compiler would actually need to encode the destination address as an offset partially within 2 Thumb instructions. With this, it would not be easy to do the address replacement within the hook string in WL4Editor. In theory, BLX ought to work, because according to the documentation, the return address should be placed in LR. However, in practice, LR does not appear to be updated by BLX in ARM7TDMI. Because of this issue, we wouldn’t be able to return from the patch code if we used BLX.
What if my hook code is not the same size as the area I’m replacing? The above example was really lucky because the hook code was exactly 18 bytes, which was the size of the area we were replacing. If the hook code ended up being smaller than the area we’re replacing, it wouldn’t really matter as long as our hardcoded return address is referencing the instruction after the area being replaced. If the hook code was larger than the area we’re replacing, we’d need to expand that area we’re replacing or find another location in the ROM.
Isn’t LR clobbered by our hook code? How will WL4 return from the function we are patching? The compiler is smart about knowing which registers to save on the stack, based on which ones are clobbered. If some function A does not call any other function B (function A would be called a “leaf” function) then the compiler typically would not push LR in function A, because LR is not modified by the code. If we were to place a hook in a leaf function, then LR would get clobbered. If you look at the execution flowchart for sub_806C794, you can see that it has successors, so it would call other functions, and we would expect that it is compiled in such a way as to save/restore LR for its own needs. Indeed, the very first instruction at 0806C794 is “PUSH {LR}”. You should always check for this; if the function you are patching is a leaf function, your hook code will need to preserve and restore LR by using the stack.
What if i want to use const array in C code? You can do something like this in the C patch files:
const unsigned char anything[] /*__attribute__((aligned(4)))*/ = {0, 1, 2, 3};
since it is impossible to define base point of the stack or the heap on the running GBA, so only const array is allowed. if you want to use some global variables. you have to define them using exact address. So far, we found that, in the iram space, space from 0x03006280 and 0x3007CE0 is not used in vanilla game. the bottom boundary is the place where the biggest function call stack will grow. So if you do a lot of things in your patches the stack will perhaps grow bigger, then the freespace bottom boundary will become some smaller value. Usually, we should just define global variables start from the top of the free space and keep its bottom boundary be flexible for function call stack.
What if i want to use some functions or some const arrays in multiple C patches but want to maintain them in one place? You can put them into a saperate C file, and set the patch type to “C_dependency” in the Patch Edit Dialog manually when loading the patch file. An example of “C_dependency” patch file looks like this:
// @Description the dependency C patch for something

// data you want to use in other patch files
const unsigned char dataArray[5] = {1, 2, 3, 4, 5};

// functions you want to use in other patch files
// we must have at least one function in the C_dependency patch file,
// or the linker script auto-generated by WL4Editor cannot set the offset for those const array correctly
// if you don't need any function in this file,
// you can put a dummy function here. Always remember that, we cannot overload function in standard C programming language.
// So in each C_dependency patch, the dummy function needs a different name.
void dummyFunc_example() {}
Then in other C patches, you need to write the declarations then use them like this:
// @Description example to use stuff from C_dependency files
// @HookAddress 0x123456
// @HookString CDCDCDCD P

extern const unsigned char dataArray[5];
extern void dummyFunc_example();

void RealEntry()
{
    // do something here with dataArray[] or something else
}
- Always remember that: don’t set the @HookAddress and the @HookString in the “C_dependency” type patch file, or it cannot be loaded into the Patch Manager of WL4Editor. Also in every “C_dependency” type patch file, the @EntryFunctionSymbol will be ignored.
- How it works: “C_dependency” type patches will always be compiled and linked before other regular patches. By grabbing all the global symbols of “C_dependency” type patches from the generated “.elf.txt”, putting them into the linker script for the rest of the regular C patches, All the other regular patches can use global symbols from all “C_dependency” patches.
Can i include header files in C code? You can include custom .h file in regular C patch and “C_dependency” type patch file. Don’t put standard C include files into those C files since functions not exist in the vanilla ROM will never work. Sometimes, when you make a new patch bundle. you feel headache to maintain those define lines in multiple files. then we just put them into the header file and maintain them together.
- There are several things no supposed to be in the header file which are*: custom functions, custom const array, extern lines for stuff in “C_dependency” patches if you want to include the *.h file in your “C_dependency” patches.
- The things supposed to be in the header file: enums, struct definition, define lines for global variables and define lines for vanilla function which can be found in the ROM.